Tag Archives: Hack

Last Update: 3-13-21 | Official Raspberry Pi Package now available – see bellow
Last Update: 11-9-20 | Updated ventz-media-pi for new Chromium version (v.84+) and new WideVine setup: v.4.10.1679.0+ NOTE: You MUST re-download and re-run it from this date to fix – lots of changes!
Last Update: 11-2-20 | Updated libwidevinecdm.so_.zip to v.4.10.1679.0 within ventz-media-pi
Last Update: 7-22-20 | Updated .desktop with Chrome User Agent string for CrOS Chrome/77.0.3865.120
Last Update: 7-20-20 | ~redacted~ company reached out about creating an official package, also there are conversations happening with ~redacted~ company about official support of the Pi
Last Update: 5-6-20 | Specify that “Raspbian with desktop” is assumed and tested
Last Update: 4-7-20 | Fixed screen tearing

Great News – This can finally be announced:) – There is now an official Raspberry Package with this work!!

Setup everything here with:

Everything from here down is the “pre-official-raspberry-package” info:

If you just want to take a Raspberry Pi 4 (as of today!) and turn it into a fully functional “Media” center by just pasting one line, here it is:

SSH to your Pi (don’t run from the Pi console if you want pretty graphics :)) and run:

This will produce the following (click to see larger image):

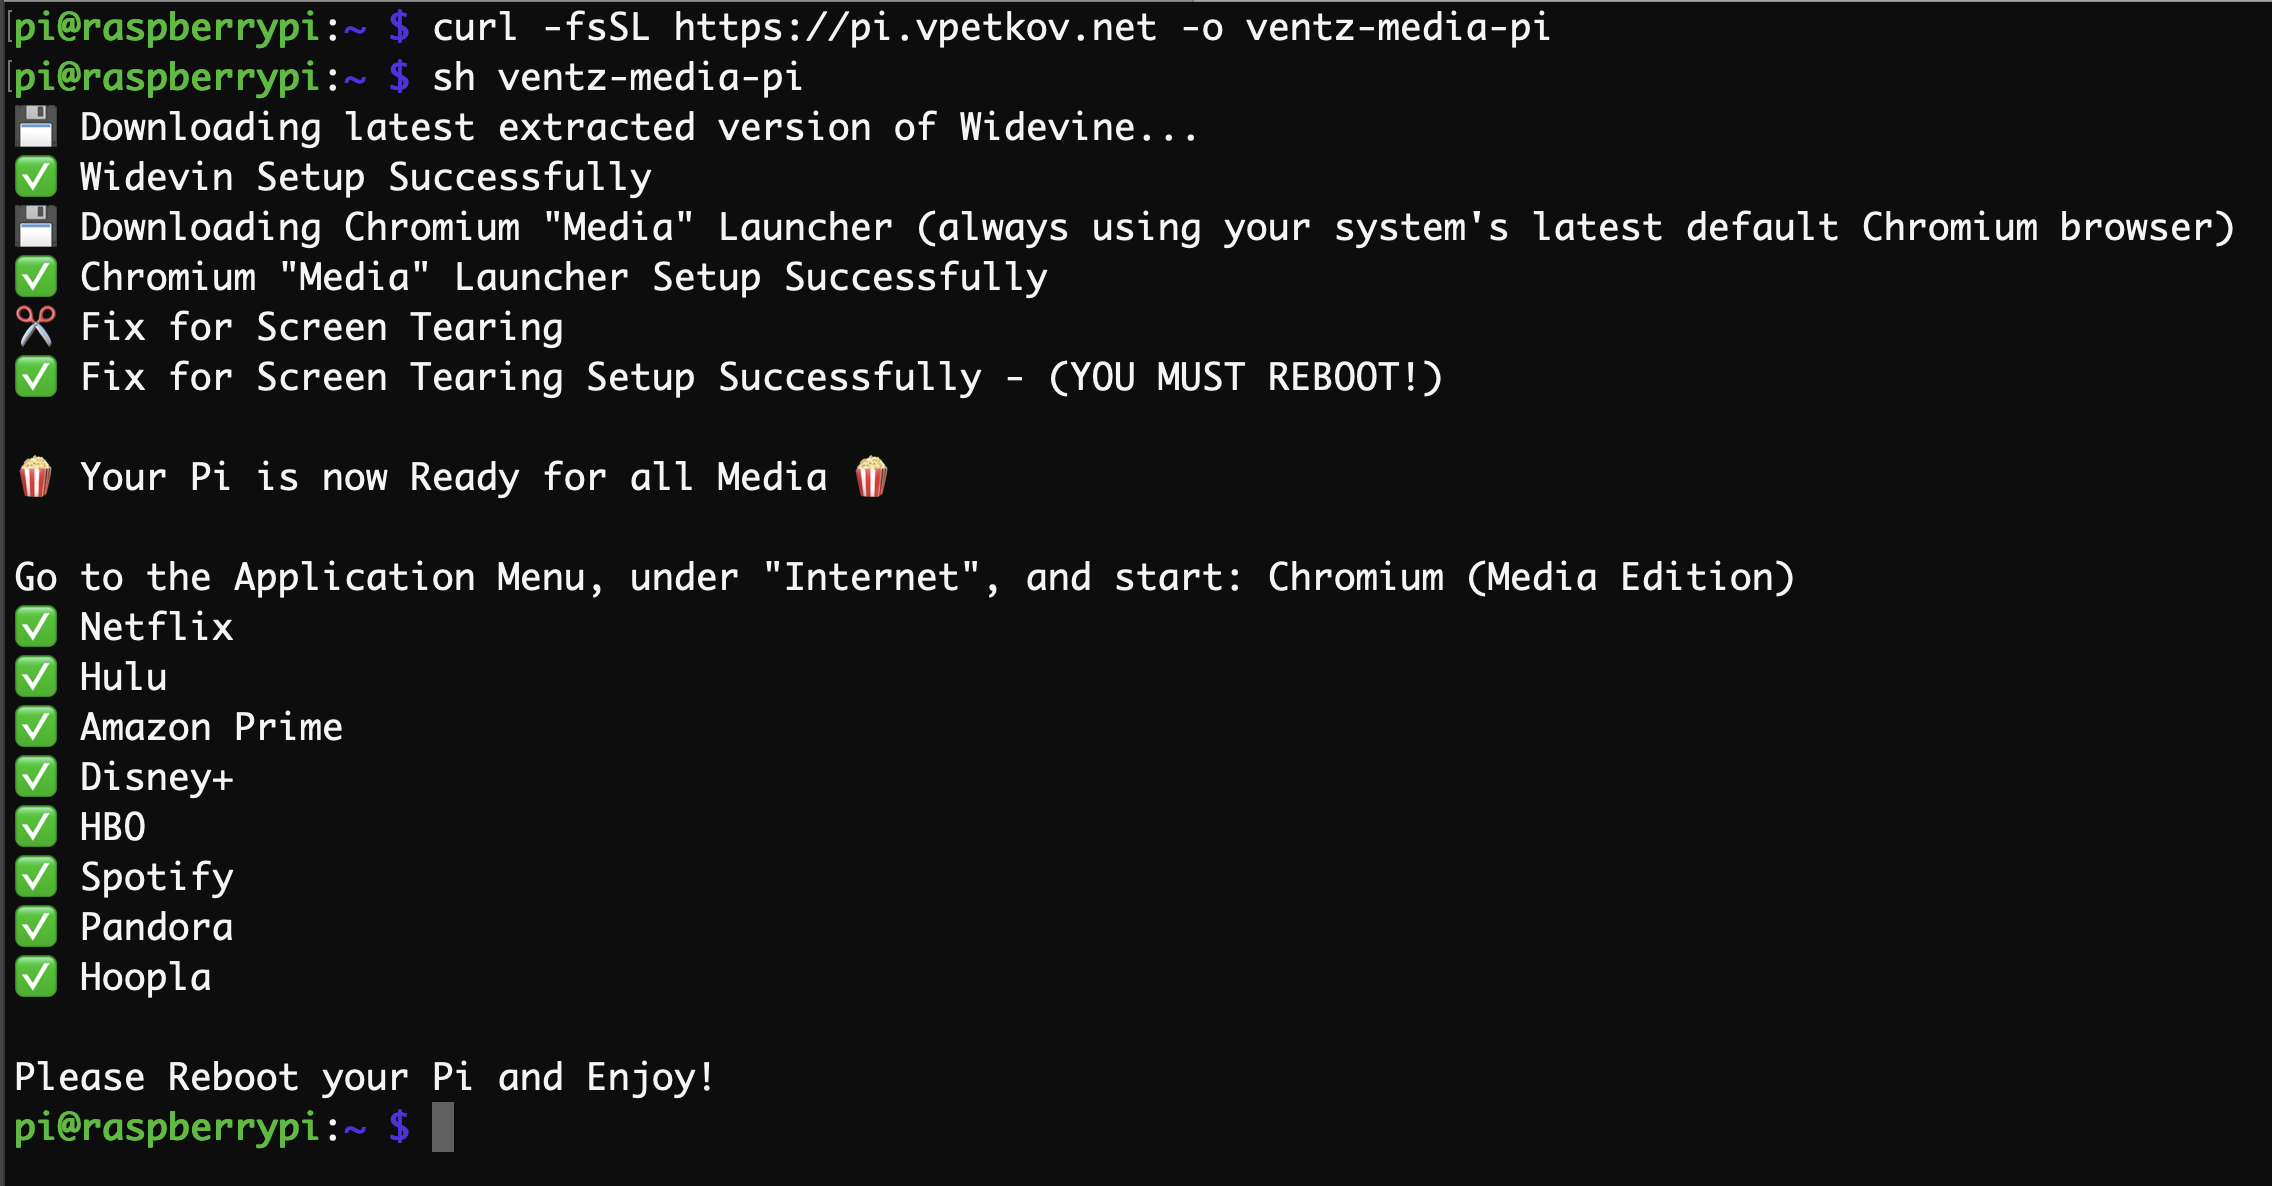
Reboot, and then from the Application Menu (top left) -> go to “Internet” -> open “Chromium (Media Edition)

You are now ready to use your Raspberry Pi on Netflix, Hulu, Amazon Prime, Disney Plus, HBO, Spotify, Pandora, and many others.

If you need to change any browser Settings, do so via the “Chromium” browser and not the “Chromium (Media Edition) – both are the same browser, so the settings are the same. The “Media Edition” (just a custom launcher with the user-agent) cannot load the settings since Chromium thinks you are launching it on “Chrome OS”, and when it checks for the Chrome OS language settings it crashes since they don’t exist.

At last, all this assumes the latest version of Raspbian with desktop (not Debian/Ubuntu! –
https://downloads.raspberrypi.org/raspbian_latest), and you can re-run the curl and sh as many times as you want without any harm.

If you are curious about some of the background and details on why you can’t easily run Netflix (and others) on your Pi and how to solve it, you are welcome to go look at my “development” blog post article: http://blog.vpetkov.net/2019/07/12/netflix-and-spotify-on-a-raspberry-pi-4-with-latest-default-chromium/

Enjoy!

As of 3-30-2020, if you want the “paste-one-line-it-just-works” go to:

http://blog.vpetkov.net/2020/03/30/raspberry-pi-netflix-one-line-easy-install-along-with-hulu-amazon-prime-disney-plus-hbo-spotify-pandora-and-many-others/

^^^ PLEASE USE POST USING ABOVE LINK FOR MY “ONE-LINE IT JUST WORKS” ^^^
(IGNORE EVERYTHING BELLOW THIS AS IT’S THE ORIGINAL DEVELOPMENT WORK)
===================================================================

Everything from this point down is out of date as of: 3-30-2020

This was my initial “netflix on the raspberry pi 4 development” blog post. Leaving it on here due to the comments, initial work, info for those interested, but I highly recommend using the easy method above (linked).

Last libwidevine extract: 3-29-2020 – v.4.10.1610.6 of libwidevine – EVERYTHING CONFIRMED WORKING


Chromium has made substantial changes the way libwidevine (and a few major things around DRM) are loaded/used/etc. They have also made changes to the setting and reading of the user-agent propagation. For some time (~2 months or so) — the combination of this badly broke Netflix. It seems they have undone the lib loading in the last couple of versions, and user @Spartacuss discovered the user-agent fix.

The instructions here (as of 3-29-2020) work for: Netflix, Hulu, HBO, Disney+, Amazon Prime, Spotify, Pandora, and many others.

The Raspberry Pi 4 model with 4GB of RAM is the first cheap hardware that can provide a real “desktop-like” experience when browsing the web/watching Netflix/etc. However, if you have tried to run Netflix on the Pi, you have quickly entered the disgusting mess that exists around DRM, WideVine (Netflix being one example of something that needs it), and Chromium.

After hours and hours of effort, I finally discovered a quick and elegant solution that lets you use the latest default provided Chromium browser, without having to recompile anything in order to watch any WideVine/DRM (Netflix, Spotify, etc) content.

Background and the DRM Problem

If you are not familiar with this, the short version is that Netflix (and many others, ex: Spotify) use the WideVine “Content Protection System” – aka DRM, and if you want to watch Netflix or something else that uses it, you need to have a WideVine plugin+browse supported integration. Chrome, Firefox, and Safari make it available for x86/amd64 systems, but not for ARM since technically they don’t have ARM builds.

Chromium, the project Chrome is based on, does have an ARM build, but it does not include any DRM support, and technically it does not include widevine support by default (*caveat here, which helps us later)
So long story short, the question becomes “how do you enable DRM/WideVine support in Chromium?”.

It seems there are two main solutions out there: use an old (v51, 55, 56, 60) version of Chromium which has been “patched” with widevine support (kusti8’s version seems to be the most popular one – except since the new Netflix changes, that also does not work), which requires uninstalling the latest Chromium available, installing the old/patched one, and dropping in older widevine plugins; the second option is to use Vivaldi – a proprietary fork of Opera which also has been “sort of patched”, but it still needs a valid libwidevinecdm plugin (see bellow) and it has it’s own issues (and also…it’s Opera…in 2019…who uses Opera?)

After a lot of research and trial and error, I discovered a much more elegant solution – use the extracted ChromeOS (armv7l – yay) binaries and insert them into Chromium + make everything think it’s ChromeOS (user agent)

Netflix/Hulu/Spotify with the Default Raspberry Pi Chromium Browser

Continue Reading →Netflix and Spotify on a Raspberry Pi 4 with Latest Default Chromium

If you did not know about this – you should be very worried.

A few hours ago it was discovered that Apple’s FaceTime app allows anyone to connect to any Apple device that supports FaceTime and hear their audio without the person ever accepting the call. What’s worse (debatably?) is that it is incredibly easy to do this.

Listen-in on any remote Apple device in 4 steps

1.) Start a FaceTime call with someone
2.) While the call is “connecting”, quickly swipe up on the FaceTime menu
3.) Click on the “+ Add Person”
4.) Add your own phone number/contact

What happens at this point is that the call is “bridged” and a remote audio line is open to the destination Apple device.

Yes – really! You have now turned the remote Apple device into a remote audio tap/bug. You can choose to keep a 2-way audio channel, or mute it from your side.

Update #1: Apparently it works on Mac OS Mojave too.

Temporary Fix – disable FaceTime

As of right now, until Apple patches this, the only fix is to disable FaceTime:

iOS

1.) open “Settings”
2.) click on “FaceTime”
3.) toggle it “off” (green toggle -> to white)

Mac OS Mojave

1.) open “FaceTime” app
2.) press “command + K”
or
2.) click on the top-left menu bar with the app name “FaceTime”, and select “Turn FaceTime Off”

A long time ago I became frustrated with having to update my WordPress plugins manually, so I created a Perl script and a blog post (https://blog.vpetkov.net/2011/08/03/script-to-upgrade-plugins-on-wordpress-to-the-latest-version-fully-automatically/) that explained how to automate this. The idea was quite simple: feed a plugin name, have the script check the WordPress plugins page for the latest versioned download, grab it, and extract it over the specified blog plugins directory and thus update the plugin.

The script was simple and it worked very well. It made dealing with plugins many times easier. However, there was one big down side as some users pointed out — it did not actually check if a plugin needed to be updated. It blindly replaced the current plugin with the latest version. This meant that there was no way to “efficiently” automate it. If you cron-ed it directly, it would simply pull and update all your plugins at whatever period you specified. For the longest time this really irritated me, but I didn’t have time to dig through WordPress to understand how the engined checked and signaled for local plugins. One particular user (Joel) forked a copy and made many improvements to deal with this specific issue.

As time went on, I decided to look at this problem again. A couple of years ago I solved it in a really elegant way, but I didn’t have time to update the blog post. A few days ago, after looking at the blog statistics, I realized that the WordPress article was one of the top 10 most popular ones. So, with that said, here is:

A new simple and elegant solution

The idea is to use the WordPress CLI in order to “query” the local plugins database for plugin names, version number, and “activated” status, and then compare the “local” plugin version with the “remote” plugin version. If the plugin is active and in need of an update, fall back to my original Perl script to update it. Aha! And now we have something that can be cron-ed 🙂

To get started, first grab the WP CLI utility. We are going to rename it, move it to an accessible place, and take care of permissions so that we can use it:

Continue Reading →Easy fully automated WordPress plugin update system

NOTE: Updated code 10-27-2018

In this day and age where everything is measured, recorded, and available remotely (via a REST API most of the time!), it really bothered me that our heating oil tank measured the remaining gallons of oil by a crude plastic dip stick. It’s not accurate, there is no historical data, and there is no way to audit (for honesty, accuracy, or problems/errors).

So the problem is simple enough: Find a quick and easy way to remotely monitor the number of gallons of heating oil in a home, and alert at pre-set intervals (let’s say 75%, 50%, and 25%) of remaining oil in the tank.

After looking for commercial solutions, the cheapest one I found is $120 with a $10/year fee. In my view, that’s simply ridiculous. I decided that I could build something better for 1/3rd of the price ($40), without an yearly fee.

Hardware How-To

Start with this Instructable I created with the exact parts/steps, and with lots of pictures:
https://www.instructables.com/id/Monitor-Heating-Oil-Tank-Gallons-With-Email-SMS-an/

This should take care of the hardware side.
Continue Reading →DIY – Monitor Heating Oil Tank Gallons with Pushbullet, SMS, and Email Alerting

[ updated 10-30-2016 | Upgraded Plex to plexmediaserver-1.1.4.2757-24ffd60.x86_64.rpm and CentOS ]

Recently I tried setting up a Plex server in a docker container. The first problem was the 127.0.0.1:32400 bind which required logging in locally or port forwarding. After doing this once, I realized that you could use the Preferences.xml file, but that meant that you couldn’t truly automate this/deploy it elegantly in a docker container. And what if you wanted to run other servers — for friends? I finally figured out how to do this in the most elegant way possible.

First – Grab your Unique Plex Access Token

Login at https://app.plex.tv/web/app with your username and password
Open your javascript console (in Chrome: View -> Developer -> JavaScript Console)
and type:
console.log(window.PLEXWEB.myPlexAccessToken);

Note the token, which will look like this: “PZwoXix8vxhQJyrdqAbY”

At this stage DO NOT click log out of your account until you register the new server. Otherwise your token will regenerate.
Once you register the server, it won’t matter after that if the token changes.

Grab my Docker Image

Check out: https://hub.docker.com/r/ventz/plex/
You can pull it down by doing:

Continue Reading →Plex server on a VPS Docker setup without port forwarding

Lately, we have seen some really bad vulnerabilities in regards to SSL (Heartbleed) and Bash (later dubbed “Shellshock”), along with some slightly “lighter” linux/open source ones.

In September of this year, Google first discovered a fallback attack for SSL v3.0, and they wrote published a paper on it: https://www.openssl.org/~bodo/ssl-poodle.pdf.
Today, it was officially confirmed that SSL version 3.0 is no longer secure, and thus, it is no longer recommended in client software (ex: web browsers, mail clients, etc…) or server software (ex: apache, postfix, etc…).
This was dubbed the “POODLE” vulnerability, and given CVE-2014-3566

A “POODLE attack” can be used against any website or browser that still supports SSLv3.
Browsers and websites need to turn off SSLv3 as soon as possible in order to avoid compromising sensitive/private information. Even though a really small percent of servers/browsers are vulnerable (mozilla estimates 0.3% of the internet), that is quite large in the total number of users.

How can I check if my browser is Vulnerable?
The guys at dshield setup this nice browser check: https://sslv3.dshield.org:444/index.html For checking your browser, use: https://www.poodletest.com

Poodletest was first mentioned to me by Curtis Wilcox.
Continue Reading →OpenSSL – SSL 3.0 Poodle Vulnerability

As some of you may have heard, a very serious remote vulnerability was discovered disclosed today within bash.

A quick summary of the problem is that bash does not properly process function definitions, which can be exported like shell variables. This is a bit like a SQL/XSS injection problem — you provide an “end” to your input, and continue writing other functions/calls after it, which then get executed.

A quick example:

A vulnerable system looks like this:
vulnerable!

A patched system looks like this:
bash: warning: x: ignoring function definition attempt
bash: error importing function definition for `x’

Continue Reading →Bash remote exploit vulnerability

UPDATE: Insecure has released v6.46 which contains all of these patches. Just grab the latest and follow the usage info here

If you don’t know what Heartbleed is, you can find out here: http://heartbleed.com/. If you don’t want to read the details above, XKCD put together a great short comic about it: http://xkcd.com/1354/

NOTE: I first put this together 3 days ago, but I am just now releasing after being asked by many people for the package and directions.

The problem: How do you scan a bit more than 5 class B’s (~328000 IP addresses) before any off the vendors (Tenable, Qualys, Rapid7) have released signatures? Easy – you build your own!
The goal was to scan as many IPs as possible at work as quickly as possible.

After using the Heartbleed github project (https://github.com/FiloSottile/Heartbleed) and creating a Dancer web service around it, I realized that there still needed to be a faster way to scan for this. How much faster?

How about a /24 (254 IP addresses) in less than 10 seconds.

I have a patched version of NMAP already (6.40) that has Heartbleed checks.
Again, Insecure has released v.6.46 which has these patches. Grab that and follow these directions

Then, you can scan like this:


If you want cleaner results, for a script, a good way to filter the output will be with something like this:

This produced a clean 2 line result, where if it’s vulnerable, it will have “ssl-heartbleed” under each host/IP address entry.


How to build your own patched NMAP binary?

But what if you don’t trust my binary? Good – let me show you how to build one yourself:

Continue Reading →Ridiculously fast Heartbleed Subnet Scanner – nmap heartbleed howto and tutorial

There are many ways to exploit a web server and gain access to the file system – read or write (sometimes both). This becomes even easier when one hosts CGIs or other dynamic code – especially when that code includes user based inputs. Recently, I found one of the most elegant exploits that I have seen for this kind of an attack vector, so I wanted to go over it and share some information about how it works and what exactly it exploits.

To setup the background for this scenario, imagine a web server (ex: ‘www.example.com’) setup with userdirs, which allows CGI execution – not an uncommon situation at all. This means that ‘user1’ will have a directory like ‘public_html’, which will become directly accessible at: ‘http://www.example.com/~user1/’. For example, creating a ‘blah’ folder in ‘/home/user1/public_html’, will create ‘http://www.example.com/~user1/blah’ on the web.

At some point, ‘user1’ creates a file called ‘x.cgi’, which simply has a GET parameter called ‘file’, and if that parameter is a file that exists, it loads it via an include. Otherwise, it loads a default.html file. Let’s assume that ‘x.cgi’ is a PHP file which looks like this:

Continue Reading →Web Exploit – user modifiable Read and Execute can give you Write access