I needed a way to monitor Docker resource usage and metrics (CPU, Memory, Network, Disk). I also wanted historical data, and ideally, pretty graphs that I could navigate and drill into.
Whatever the solution was going to be, it had to be very open and customizable, easy to setup and scale for a production-like environment (stability, size), and ideally cheap/free. But most of all — it had to make sense and really be straight forward.
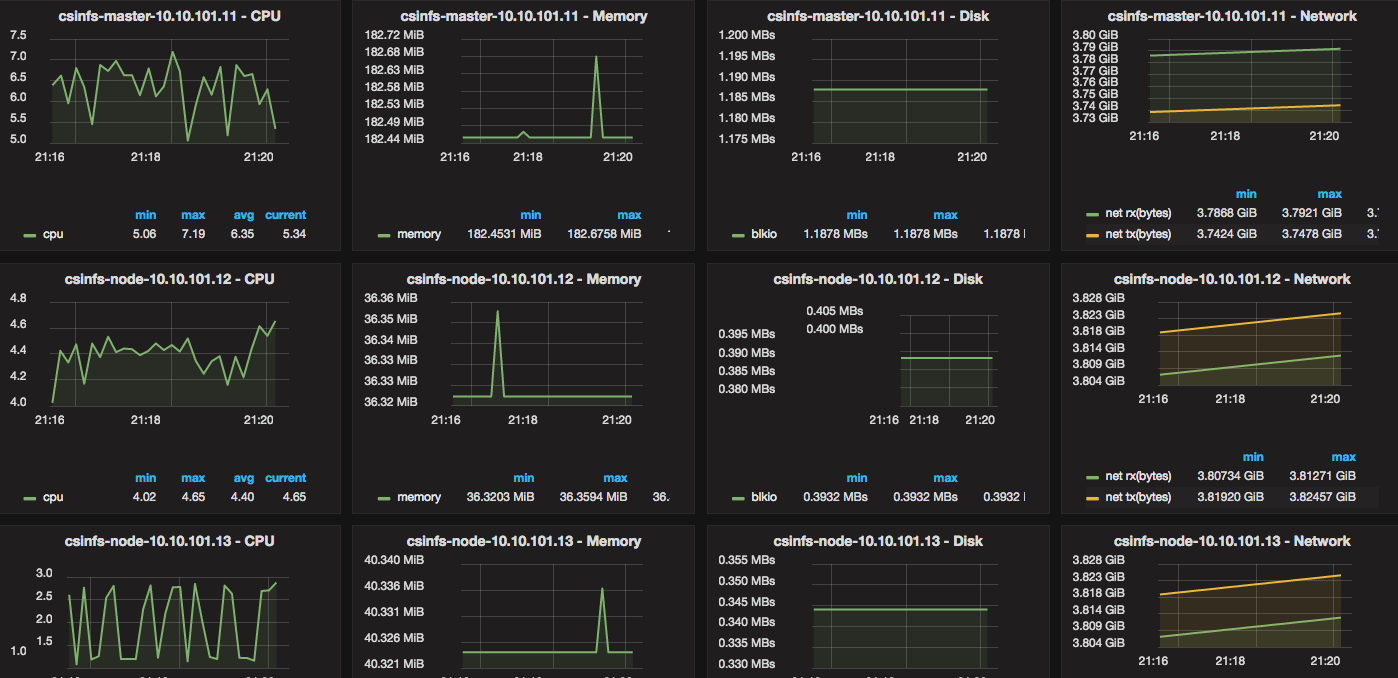
3 Containers and 10 minutes is all you need
To get this:
There are 3 components that are started via containers:
Grafana (dashboard/visual metrics and analytics)
InfluxDB (time-series DB)
Telegraf (time-series collector) – 1 per Docker host
The idea is that you first launch Grafana, and then launch InfluxDB. You configure Grafana (via the web) to point to InfluxDB’s IP, and then you setup a Telegraf container on each Docker host that you want to monitor. Telegraf collects all the metrics and feeds them into a central InfluxDB, and Grafana displays them.
Setting up the network interfaces is something that seems to give people a hard time (clearly visible here: http://docs.openstack.org/grizzly/basic-install/apt/content/basic-install_network.html). If you follow that guide, one of the most confusing points is how the Open vSwitch fits into the existing architecture.
Assuming you are following the guide, you have 2 networks:
10.10.10.0/24 -> private
10.0.0.0/24 -> public
Your Network Controller, again per the guide, will have an internal-network interface of “10.10.10.9” and an external-network interface of “10.0.0.9”
Your starting network config (/etc/network/interfaces) file will look like this:
Recently, while setting up my the network controller for OpenStack, I saw this message:
# tail -f /var/log/quantum/openvswitch-agent.log
ERROR [quantum.plugins.openvswitch.agent.ovs_quantum_agent] Failed to create OVS patch port. Cannot have tunneling enabled on this agent, since this version of OVS does not support tunnels or patch ports. Agent terminated!
What this means is that the versio of the datapath (shipped by Ubuntu) does not have the support needed to create tunnels or patch ports. This happened on Ubuntu 13.04.
Fortunately, it is VERY easy to solve this. You need to simply build your own datapath for your kernel. For this, you OpenvSwitch’s datapath source, and you need module-assistant:
You can then grab your kernel headers and any other dependencies:
1
2
3
module-assistant prepare
I noticed that either the kernel headers do not have the version.h in the right place, or the module-assistant looks in the wrong place. You can solve this by doing:
1
2
3
4
cd/lib/modules/`uname-r`/build/include/linux
ln-s../generated/uapi/linux/version.h.
And finally, to download, build, and install the modulle:
Now, reboot your system so that the new module is loaded, and you are ready to go. You will notice that “/var/log/quantum/openvswitch-agent.log” no longer has this issue.
This post is a bit different, but I think some people will find it very interesting. What got me to write this was an interesting article posted by Kevin Mitnick via his twitter account: http://news.cnet.com/8301-27080_3-20077732-245/kevin-mitnick-shows-how-easy-it-is-to-hack-a-phone/?part=rss&tag=feed&subj=News-Security. Kevin’s claim is that “Any 15-year-old that knows how to write a simple script can find a VoIP provider that spoofs caller ID and set this up in about 30 minutes”, and my only question is: what will you do with the other 25 minutes?
START OF NOTE AND WARNING! Spoofing your Caller ID is legal in the US only if done via VOIP services for legal and legitimate uses, or to block sending your caller ID, but again, only if it is used for legal purposes. An example of a legitimate use is spoofing your own home/cell phone number when making outbound calls via VOIP/SIP. Another example would be spoofing an outgoing number (a bit like NATing) when sitting at a private (let’s say for example 2,3,4, or 5 digit) extension. There are many scenarios where this is absolutely needed — like offices, enterprises, remote employees/road warriors, and phone support.
Spoofing your Caller ID is not legal for false identity, threatening/harassing someone, pranking, lying, or other such negative and immoral actions. If you are interested in some more information, you can find some here: http://www.gordostuff.com/2011/06/fcc-ups-caller-id-spoofing-penalties.html, and here: http://www.gordostuff.com/2011/02/is-faking-caller-id-legal-in-united.html. This said, I am providing this information for anyone who wants to learn about how this is done, or/and is interested in setting it up for their business or personal use, but ONLY for legal and legitimate uses. I am in no way responsible if you do something stupid or illegal. Here is a good background/history and more information on Caller ID Spoofing: http://www.calleridspoofing.info/ END OF NOTE AND WARNING!
The assumption here is that you have some things already setup and working. The article is titled “Spoofing Caller ID on the fly from any phone” and not “how to spoof your Caller ID”. I am assuming that you have: a sip trunk provider with an outgoing plan, a DID, a SIP server with some advanced features (Asterisk and OpenPBX, or something like TrixBox), and most of all — a working setup. The first step is getting DISA (Direct Inward System Access – http://www.voip-info.org/wiki/view/Asterisk+cmd+DISA). The idea is that you will dial your DID phone number, and the sip trunk provider will route it to your IP address. From there, your server will handle the call and connect you inside your system. I absolutely suggest setting up a DISA password/passcode, otherwise, you leave yourself open to abuse and other people will be able to potentially make calls and use your sip account. It is also important to note that generally, you can simply set a from name and number right here in the DISA outbound options. But again, the idea is to make this dynamic. Ones you dial into your system, the next step is to setup an extension that will handle the rest of this. Leave your context “from-internal” if you want to be able to make external calls by default — necessary in order to bridge the active call to your destination. If you are using Asterisk or TrixBox, go to /etc/asterisk/extensions_custom.conf, and enter something like this:
Now here’s what’s happening: When you get your DID, you get the DISA context. From there, after you authenticate yourself with a pin and now you are in your system. At this point, you would hook in your custom context, in this case called “proof-of-concept-custom”. Make sure that the word “custom” is present somewhere. At this point, your recipe will be executed. The first thing you want to do is answer. You can look up each of these commands at the voip-info.org website. For example, Answer: http://www.voip-info.org/wiki/view/Asterisk+cmd+Answer. The next step is to wait 2 seconds. Then you will speak out the current caller ID. This is really just so you know where you are coming from – it is not neccessary. The play (mp3/wav/etc…) play is not really necessary either, but it can be used to queue up different actions. If you will play something, the suggestion is to Answer the channel before hand, and pause/wait for a bit. The next step is to read 10 digits into the “digito” variable. For good measure, and to prevent a mistake, you can speak out the digits again, and then set them as the current Caller ID (the spoofing part). At this point, you can play another sound to queue up the next action. As an extra precaution/security-by-obscurity step, you can prompt for another pin. In this case, it’s “98765”. After the pin has been successfully entered, you can signal via a sound, and then dial and bridge the call to the same number that you set as your Caller ID (impractical, but just for the purpose of a proof of concept). You can very easily modify this to ask for a destination number and call that destination number instead. Please note that this will charge you a twice from the point that you dial the call and bridge it — once for the current/already active call, and once for the new call that you are making to your destination.
Again, there are many legitimate and absolutely necessary cases for this. If you work in any company, most of the time they will not disclose private numbers. If the company is very large, they might simply not have/want to buy individual “routable” phone numbers. Your desk extension of “1234” can be masked behind a general number which routes to “directory/support” when called back. Another great case is someone who works from remote. Say that you work from home and are part of a support group. A customer calls you and reports a problem. Now you want to call the customer back, but you don’t want him to have your personal home number/cellphone – you can spoof your support number and call the customer back.
Something interesting to note is that VOIP/SIP system can choose to not respect Caller ID (cid) blocking/spoofing, and and 1-800/other TOLL-FREE numbers simply do not respect it.
The only point of this article is to demonstrate how easy it is to achieve this dynamically. Again, this is something that you can very easily set statically in the extension or DISA settings. This is not something new or mind blowing. You could have done this over 10 years ago. The point is that you can have a setup which can be activated from any phone and within 30 seconds or less, you can have a dynamically spoofed Caller ID number.
If you want to read my full story behind why I even went this route, please continue bellow:
Recently I started looking at getting rid of as much physical infrastructure as possible. My reasons, among it being a pain to maintain, everything surrounding having your own infrastructure is a downfall. Let’s face it — you can’t afford what is really needed to have 99.99%-100% uptime. There are tricks that you can use to join multiple sites, but again, when you really get into it, it costs money and it takes time. Other than having an ESX server as a personal “lab”, I’ve realized that I spend just as much time dealing with physical infrastructure, as I do creating services, hosting stuff, automating things, and programming. This is just wrong! Also, hosting your own infrastructure means dealing with power, bandwidth, static IPs, etc… Anyway, so with that in mind, I started looking at getting rid of my biggest service which had the fewest users — Email.
I hosted a Zimbra server (which I absolutely love) for almost a year, and before that I hosted for 7+ years (and still do at different locations) mail servers running Postfix+Dovecot+SpamAssassin with Some webmail client (Squirrelmail or RoundCube). The problem with hosting your own email server (i’ll use Postfix synonymous with email server) is that everything is a hassle and a half. At the end of the day, if you have one Postfix server, this is fine. If you have 50+ Postfix servers, not so much. And yes, you can ease it by using puppet and common config management like svn+rsync, but it’s still a hassle. The other problem is that common needs like push email, exchange, blackberry BES, calendars, notes, and others simply do not exist as a “one in all” solution that attaches to Postfix. I realized that while being extremely efficient, and while procmail being simply priceless, it is not economical at the end of the day. Users want ease of use, convenience, pretty UIs, and no spam without any effort on their behalf.
This led me into looking at Google Apps (I’ll use Gmail synonymous). It seemed like the perfect solution — off site, fully managed, relatively cheap (or free), common UI which almost everyone is familiar with, and virtually no spam. It provided smtp(s), imap(s), pop(s), and other common services. The few problems that should be brought up front are: privacy, security, space, and limitations. With “GMail”, (free google app), you are limited to 7-7.5GB per user, 25 users, and “some” advanced SMTP features. You can always pay $50/year/account in order to 25GB with unlimited users and some more programmable/API features. The thing that really attracted me was the ability to get an “all-in-one” solution that was extremely easy to deploy for multiple users. The reality is that most users just want their own email at their own domain, with some storage, some web UI, and no spam or viruses. This was something that I was doing with my “Postfix setup”, and I had scripted quite well infact, but with Google Apps, it was a matter of 15 minutes per account.
Now, the main two problems were: how do my users who use mutt (myself being one of them) get to their email, and how to existing services AND “dumb services” (storage devices, vCenter, etc…) communicate to the “Gmail” servers. The first — mutt — turned out to be much easier than I thought. If you are already using mutt with any authenticated IMAP/SMTP server, you have probably already stumbled onto: msmtp. With a little more work, and you can get this piece of software to work perfectly with Gmail. If you need some help, check out: http://blog.vpetkov.net/documentation/network-services/smtps-and-imaps/mutt-with-google-gmailgoogle-apps-or-any-imap-server/ The second problem turned out to be relatively easy, after doing some research and a bit of trial and error. The main idea is that you create a simple “relay” server in a way. A lightweight Postfix installation which only auths and forwards/relays all the emails to Gmail/Google Apps/any IMAP server for that matter. I went the extra step and configured it to be able to use different SMTP servers with different auth based on different user/email accounts. You can get all the technically details at the top of this post. Good luck, and I hope this saves you some time.
Hey There, Welcome! I finally brought up a new website. It is far from complete, but a little by little, it will get there. Recreating all of the documentation will take a long time, so please be patient and check back often. My website needed a redesign for a very long time, and I kept putting it off since there was never enough time. I thought long and hard about how this website should look and feel in order to be simple/minimalistic, and clean, while offering very rich and detailed information — mostly in the form of documentation and “what’s new or on my mind” articles.
What started this was my realization that it was time to migrate everything away from PmWiki. While PmWiki was a great replacement for my original static site, I slowly outgrew it. I started using it (no, I actually used about 7 other wikis first until I stumbled onto PmWiki) because I wanted a quick way to add documentation while I wasn’t near a terminal. After wikis got popular and the spammers started hitting them, I quickly password protected it. Then, a little by little, I kept adding more plugg-ins/mods, themes, and custom code. A little by little, I realized that other than the dynamic text entry, I had re-written or customized almost everything. It got to a point where I spent more time maintaining the wiki around upgrades than the actual documents and articles.
Due to this, I started a blog — using WordPress. My initial impression was that WordPress was very heavy and bogged down, and very ugly. I did not like my initial experience. I switched to another blog suite — textblog. After a few months I realized that I needed more functionality, so I deployed a simple php blog. After a few more weeks I decided to give WordPress another chance, since I had just read an article that they were going to release a new “ajax” management interface. This is what hooked me onto WordPress. However, as time went on, I realized that maintaing PmWiki *and* WordPress was almost a full time job. I spent endless nights trying to customize the code on each one in order to make them fit a common theme. I finally gave up and decided to just shut down my website. After a few months, I came to the conclusion that the documentation and articles I had were not only useful to others, but to myself too, and I actually missed having them up to date. This brought on a new goal: use a documentation source and a dynamic article software under one common system. I looked at WordPress’ ‘Pages’, and liked them for the most part. While not amazing, they suffice. At last, it was decided: I was going to use WordPress to replace my Wiki and Blog.
Before I started head on, I looked at some content management systems (CMS) like Joomla, and Drupal. I had actually used Drupal at a previous job, and I hated it, and Joomla simply reminded me too much of Drupal. I looked at a few other ones, but the story was the same. The reality is that the documentation pages are static for the most part. They get written once, and stay the same for the most part, with small changes here and there. CMS’ on the other hand are more like portal drop-ins. This is also why they require a lot more work. I had already been on the side of maintaining things, and I just wanted something that “worked”.
Here we are now, with WordPress as the documentation system (via Pages), and the dynamic article system (via the blog engine). I did have to spend a good 4-5 hours getting everything configured and customized, but with the exception of a small piece of code, all of my customizations will not be impacted all all by upgrades. This is it. I will keep this theme, look, and feel for a very long time. My main goal is provide lots of documentation in a few categories: Network Services, Smart Phones, Security, Programming, and at last, Operating Systems. Each of those has many sub-categories, but you can find more from the Pages. I will also provide any and all files/scripts/programs that I either come accross, or create.
At last, everything is free for grabs. You may take, modify, and/or share anything from this website — of course, at your own risk. I would prefer if you give credit and put a link to my site, but you are not required to. Thanks, and I hope you find all of the information here useful.