Tag Archives: Cloud

NOTE: Updated code 10-27-2018

In this day and age where everything is measured, recorded, and available remotely (via a REST API most of the time!), it really bothered me that our heating oil tank measured the remaining gallons of oil by a crude plastic dip stick. It’s not accurate, there is no historical data, and there is no way to audit (for honesty, accuracy, or problems/errors).

So the problem is simple enough: Find a quick and easy way to remotely monitor the number of gallons of heating oil in a home, and alert at pre-set intervals (let’s say 75%, 50%, and 25%) of remaining oil in the tank.

After looking for commercial solutions, the cheapest one I found is $120 with a $10/year fee. In my view, that’s simply ridiculous. I decided that I could build something better for 1/3rd of the price ($40), without an yearly fee.

Hardware How-To

Start with this Instructable I created with the exact parts/steps, and with lots of pictures:
https://www.instructables.com/id/Monitor-Heating-Oil-Tank-Gallons-With-Email-SMS-an/

This should take care of the hardware side.
Continue Reading →DIY – Monitor Heating Oil Tank Gallons with Pushbullet, SMS, and Email Alerting

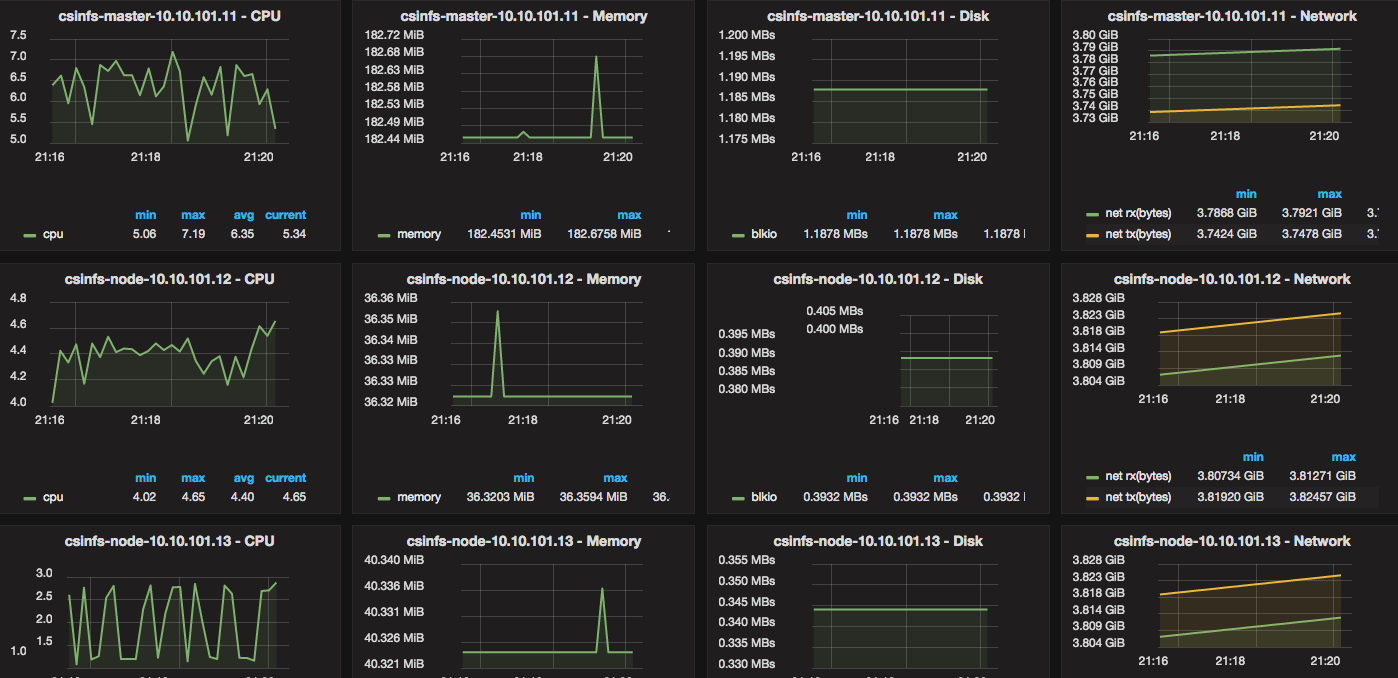
I needed a way to monitor Docker resource usage and metrics (CPU, Memory, Network, Disk). I also wanted historical data, and ideally, pretty graphs that I could navigate and drill into.

Whatever the solution was going to be, it had to be very open and customizable, easy to setup and scale for a production-like environment (stability, size), and ideally cheap/free. But most of all — it had to make sense and really be straight forward.

3 Containers and 10 minutes is all you need

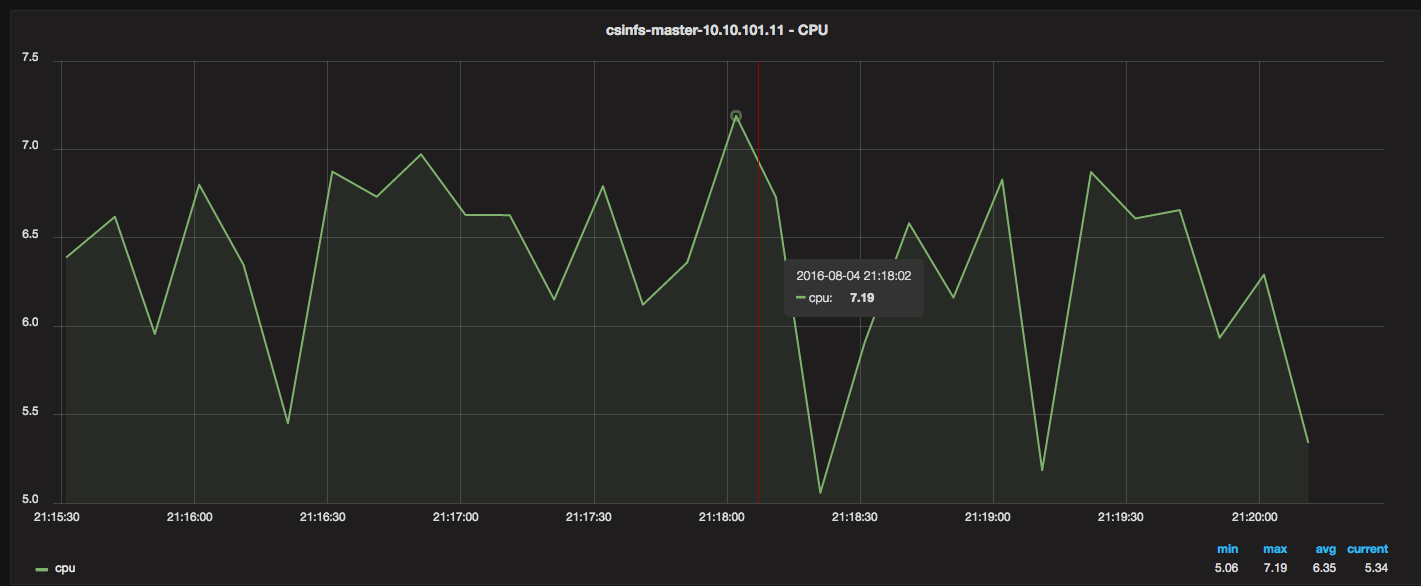
To get this:
docker_metrics01

docker_metrics02
There are 3 components that are started via containers:

Grafana (dashboard/visual metrics and analytics)
InfluxDB (time-series DB)
Telegraf (time-series collector) – 1 per Docker host

The idea is that you first launch Grafana, and then launch InfluxDB. You configure Grafana (via the web) to point to InfluxDB’s IP, and then you setup a Telegraf container on each Docker host that you want to monitor. Telegraf collects all the metrics and feeds them into a central InfluxDB, and Grafana displays them.

Setup Tutorial/Examples

Continue Reading →Monitor Docker resource metrics with Grafana, InfluxDB, and Telegraf

If you have not used Swarm, skim the non-service-discovery tutorial to get a feel for how it works:
https://blog.vpetkov.net/2015/12/07/docker-swarm-tutorial-and-examples. It’s very easy, and it should give you an idea of how it works within a couple of minutes.

Using Swarm with pre-generated static tokens is useful, but there are many benefits to using a service discovery backend. For example, you can utilize network overlays and have common “bridges” that span multiple hosts (https://docs.docker.com/engine/userguide/networking/get-started-overlay/). It also provides service registration and discovery for the Docker containers launched into the Swarm. Now lets get into how to use it with service discovery – which is what you would use in a scaled out environment/production.

Again, assuming you have a bunch of servers running docker:
vm01 (10.0.0.101), vm02 (10.0.0.102), vm03 (10.0.0.103), vm04 (10.0.0.104)

Normally, you can do “docker ps” on each host for example:
ssh vm01 ‘docker ps’
ssh vm04 ‘docker ps’

If you enable the API for remote bind on each host you can manage them from a central place:
docker -H tcp://vm01:2375 ps
docker -H tcp://vm04:2375 ps
(note: port is optional for default)

But if you want to use all of these docker engines as a cluster, you need Swarm.
Here we will go one step further and use a common service discovery backend (Consul).

Docker Swarm Tutorial with Consul and How-To/Examples

Continue Reading →Docker Swarm Tutorial with Consul (Service Discovery) and Examples

[ updated 10-30-2016 | Upgraded Plex to plexmediaserver-1.1.4.2757-24ffd60.x86_64.rpm and CentOS ]

Recently I tried setting up a Plex server in a docker container. The first problem was the 127.0.0.1:32400 bind which required logging in locally or port forwarding. After doing this once, I realized that you could use the Preferences.xml file, but that meant that you couldn’t truly automate this/deploy it elegantly in a docker container. And what if you wanted to run other servers — for friends? I finally figured out how to do this in the most elegant way possible.

First – Grab your Unique Plex Access Token

Login at https://app.plex.tv/web/app with your username and password
Open your javascript console (in Chrome: View -> Developer -> JavaScript Console)
and type:
console.log(window.PLEXWEB.myPlexAccessToken);

Note the token, which will look like this: “PZwoXix8vxhQJyrdqAbY”

At this stage DO NOT click log out of your account until you register the new server. Otherwise your token will regenerate.
Once you register the server, it won’t matter after that if the token changes.

Grab my Docker Image

Check out: https://hub.docker.com/r/ventz/plex/
You can pull it down by doing:

Continue Reading →Plex server on a VPS Docker setup without port forwarding

A bit of background and the “old/normal way”

If you use Docker, you very quickly run into a common question: how do you make Docker work across multiple hosts, datacenters, and different clouds. One of the simplest solutions is Docker Swarm. Docker summarizes it best as “a native clustering for Docker…[which] allows you create and access to a pool of Docker hosts using the full suite of Docker tools.”

One of the biggest benefits to using Docker Swarm is that it provides the standard Docker API, which means that all of the existing Docker management tools (and 3rd party products) just work out of the box as they do with a single host. The only difference is that they now scale transparently over multiple hosts.

After reading up on it HERE and HERE, it was evident that this is a pretty simple service, but it wasn’t 100% clear what went where. After searching around the web, I realized that almost all of the tutorials and examples on Docker Swarm involved either docker-machine or very convoluted examples which did not explain what was happening on which component. With that said, here is a very simple Docker Swarm Tutorial with some practical examples.

Assuming you have a bunch of servers running docker:
vm01 (10.0.0.101), vm02 (10.0.0.102), vm03 (10.0.0.103), vm04 (10.0.0.104)

Continue Reading →Docker Swarm Tutorial and Examples

UPDATE: Insecure has released v6.46 which contains all of these patches. Just grab the latest and follow the usage info here

If you don’t know what Heartbleed is, you can find out here: http://heartbleed.com/. If you don’t want to read the details above, XKCD put together a great short comic about it: http://xkcd.com/1354/

NOTE: I first put this together 3 days ago, but I am just now releasing after being asked by many people for the package and directions.

The problem: How do you scan a bit more than 5 class B’s (~328000 IP addresses) before any off the vendors (Tenable, Qualys, Rapid7) have released signatures? Easy – you build your own!
The goal was to scan as many IPs as possible at work as quickly as possible.

After using the Heartbleed github project (https://github.com/FiloSottile/Heartbleed) and creating a Dancer web service around it, I realized that there still needed to be a faster way to scan for this. How much faster?

How about a /24 (254 IP addresses) in less than 10 seconds.

I have a patched version of NMAP already (6.40) that has Heartbleed checks.
Again, Insecure has released v.6.46 which has these patches. Grab that and follow these directions

Then, you can scan like this:


If you want cleaner results, for a script, a good way to filter the output will be with something like this:

This produced a clean 2 line result, where if it’s vulnerable, it will have “ssl-heartbleed” under each host/IP address entry.


How to build your own patched NMAP binary?

But what if you don’t trust my binary? Good – let me show you how to build one yourself:

Continue Reading →Ridiculously fast Heartbleed Subnet Scanner – nmap heartbleed howto and tutorial

Recently, while setting up my the network controller for OpenStack, I saw this message:

# tail -f /var/log/quantum/openvswitch-agent.log

ERROR [quantum.plugins.openvswitch.agent.ovs_quantum_agent] Failed to create OVS patch port. Cannot have tunneling enabled on this agent, since this version of OVS does not support tunnels or patch ports. Agent terminated!

What this means is that the versio of the datapath (shipped by Ubuntu) does not have the support needed to create tunnels or patch ports. This happened on Ubuntu 13.04.

Fortunately, it is VERY easy to solve this. You need to simply build your own datapath for your kernel. For this, you OpenvSwitch’s datapath source, and you need module-assistant:

You can then grab your kernel headers and any other dependencies:

I noticed that either the kernel headers do not have the version.h in the right place, or the module-assistant looks in the wrong place. You can solve this by doing:

And finally, to download, build, and install the modulle:

Now, reboot your system so that the new module is loaded, and you are ready to go. You will notice that “/var/log/quantum/openvswitch-agent.log” no longer has this issue.

For anyone who has not been following what is going on with WikiLeaks, here is a good place to start:

http://www.guardian.co.uk/media/2010/dec/03/wikileaks-us-censorship-row

https://www.eff.org/deeplinks/2010/12/amazon-and-wikileaks-first-amendment-only-strong

WikiLeaks is a “whistle blowing” website. A quick search about it brings you to:

Wikileaks was a website that published anonymous submissions and leaks of sensitive governmental, corporate, organizational, or religious documents, while attempting to preserve the anonymity and untraceability of its contributors.

This week WikiLeaks released some sensitive US documents:

The classified diplomatic cables released by online whistleblower WikiLeaks and reported on by news organizations in the United States and Europe provided often unflattering assessments of foreign leaders, including those of Germany and Italy.

The cables also contained revelations about long-simmering nuclear trouble spots, detailing U.S., Israeli and Arab fears of Iran’s growing nuclear program; U.S. concerns about Pakistan’s atomic arsenal; and U.S. discussions about a united Korean peninsula as a long-term solution to North Korean aggression.

There are also U.S. memos encouraging U.S. diplomats at the United Nations to collect detailed data about the UN secretary-general, his team and foreign diplomats ― going beyond what is considered the normal run of information-gathering expected in diplomatic circles.

None of the revelations is particularly explosive, but their publication could prove problematic for the officials concerned.

The short version of what happened is that WikiLeaks was the target of many DDoS attacks. Eventually, the website was shut down. They decided to change their hosting provider and use Amazon’s AWS (Public Cloud Service). After a few days, Amazon shut down their website claiming that it violated their terms of service. They brought the site in another location, and then their DNS provider decided to shut them down.

The reality is that WikiLeaks is exercising their right of freedom of speech. The problem is that they have some very sensitive information, and this makes political high profile figures nervous. However, when you move past the details of what happened, you come to the realization and real concern — Public Cloud Censorship.

This is the perfect example of why companies are afraid of using Public Clouds (outsourcing your infrastructure to someone else). As you can see from this example, your entire business can be shut down in a matter of minutes, just because someone has a different opinion than yours. This brings massive concern and rightfully so. I really think that the long term solution is private clouds. Take this great technology and deploy it within your own datacenter. When you look at this from the top, it looks a lot like web hosting — you can either outsource your web hosting to a company like DreamHost and BlueHost, or you can do it yourself. There are benefits to both, but at the end, it comes down to your concern for privacy and freedom.

Along with many other people, I personally think that Amazon had the chance to do something great, and as the Guardian and EFF pointed out: “Instead, Amazon ran away with its tail between its legs.”